Pulling a Bastion in PlanetSide 2 can be quite a daunting task. It costs a lot of time and effort to craft, therefore we should try to get the most out it each and every time we pull it. This article will describe the functions the Bastion can perform, both practically and in terms of the map meta. It will also outline how to manage the Platoon when a Bastion is pulled.
¶ Features
- A Bastion lasts for a maximum of 60 minutes. If you manage to preserve your Bastion this long, well done! At this point, the carrier despawns.
- Only one Bastion can be deployed per faction per continent.
- The Bastion hovers at a fixed level, and is controlled by right clicking the map and minimap as the pilot. Anyone with the appropriate outfit armoury permissions can pull and pilot the Bastion.
- There are 48 seats available in the Bastion. One for the Pilot, 9 gunner seats. The remaining 38 seats are for transportation and pulling Interceptor ESFs (outfit members only).
¶ Weaponry
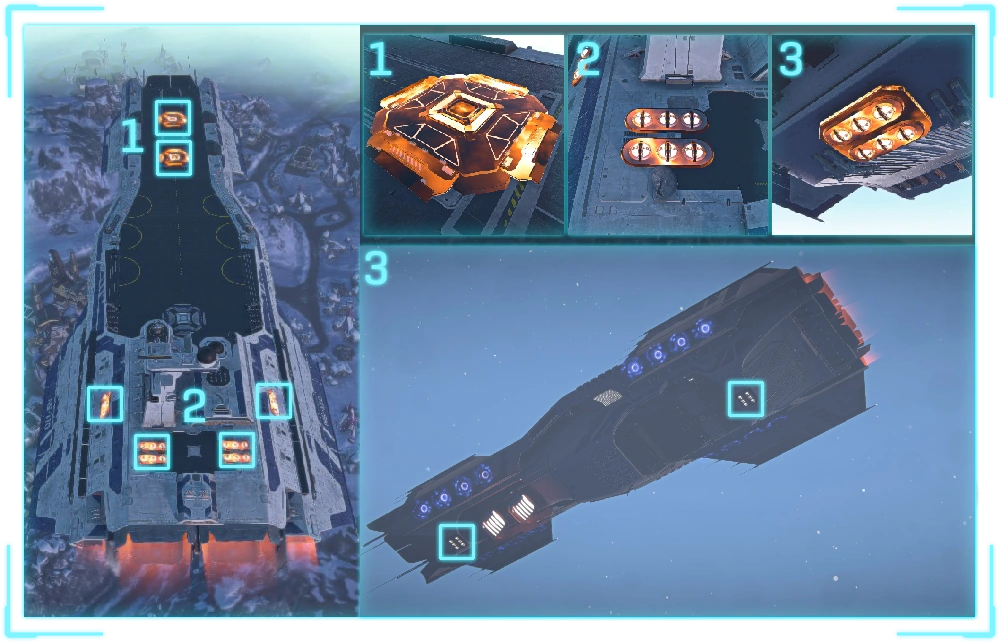
- 3 Anti Air Turrets on the top deck.
- 2 Anti Air Turrets on the underbelly.
- 4 Bastion Battery Anti Vehicle Turrets on the underbelly.
- Interceptor ESFs for outfit members. Whenever an outfit member exits the Bastion, they will spawn in a specialised Air to Air ESF for no cost.
¶ Layout
A Bastion has a total of 100,000 health, spread across 8 Hardpoints (17,500 health each). These cannot be repaired, and are counted as aircraft for the purposes of lock-on weaponry. A screenshot of these Hardpoints can be seen below.

Pro tip! If commanding an Airball against an enemy Bastion, make sure you request rocket pods. They do much more damage against Hardpoints than an ESF nosegun.
¶ Controls
The Bastion is controlled through the map and minimap mouse interface. The pilot can place a variety of waypoints, each with a different function.
- Bastion Move Destination: Simply moves the Bastion to the designated waypoint.
- Bastion Assault Facility: Doubles the capture rate in the related hex. Only applicable when attacking bases.
- Bastion Lockdown Facility: Pauses the capture process in the related hex. Only applicable when defending bases.
- Bastion Anchor: Provides a spawn option for all allies on the continent.
Pro tip! If your Bastion is under attack, you can quickly execute multiple Move orders to “wiggle” the Bastion from side to side. Doing this makes it harder for enemies to hit your Hardpoints.
¶ How to use a Bastion effectively
It is critical to understand that the Bastion is a Platoon level outfit armoury resource, and therefore should ideally be utilised with the full support of an FU Platoon. Left unsupported and unmonitored, the Bastion is nothing more than a cert piñata for the opposing factions. Here is an example outlining the Platoon level setup when pulling a Bastion.
- The Platoon leader takes direct control of all squads. Squad leaders can still provide tactical guidance in squad chat as appropriate, however the Platoon leader must have the authority to exercise direct control at all times.
- Designate one squad as Bastion Gunners and Air Support at all times. This squad should be committed to utilising the Bastion weaponry and Interceptor ESFs, as well as map reading and scouting for enemy Airballs and Colossi. You can also include a couple of Repair Galaxies. These add sustainability to friendly ESFs, as well as physically covering the Hardpoints.
- SCOUTING IS THE MOST IMPORTANT FUNCTION IN A BASTION PLATOON. Without this, you are flying blind, and as a Platoon leader you will be unable to accurately allocate your resources.
- The other 3 squads should be flex squads, able to transition between Infantry, Armour and Aircraft as and when necessary. The Platoon leader calls for these transitions based on the scouting information they are given, as well as analysing the map.
- Do not rely on Command for support. Liaising with other leaders can be beneficial, however constant calls for support on Command will annoy and over time alienate other outfit leaders.
¶ When to pull the Bastion
There is little point in pulling the Bastion unless you have the correct platoon level support, map condition and timer (if you wish to use it to influence the alert). Here are some prerequisites to guide you on when it is appropriate to pull the Bastion.
Internal Prerequisites:
- A full platoon.
- At least a full squad's worth of FU members willing and able to man the Bastion. This is usually organised into Delta squad by the Platoon Leader.
- A handful of dedicated scouts. As mentioned earlier, these players must be vocal and provide accurate information as to potential risks and spotted threats.
External Prerequisites:
- At the most, an hour remaining on the alert timer. Assuming you can maintain the Bastion, you will get the full use out of the asset by pulling at this time.
- At minimum, half an hour remaining in the alert. The last 30 minutes are when the Bastion can be most useful to the alert if managed correctly. It allows you to force the enemy to either deal with you, or suffer a huge disadvantage in any fight you decide to engage with.
Recommended Conditions:
- Having less territory in the alert overall. This places your Bastion further away from the enemy Warpgate, making enemy Airballs less likely.
- Specifically for VS Miller, knowledge of whether DIG and KOTV are both active. They will dump 100 scythes on your Bastion until you lose it. Avoid pulling in these sorts of conditions.